New World Controller Support - Complete Guide
Learn how to create the best controller set up for New World.


Updated for PTR at 02/15/2024
Controller support is coming to New World! Select from two pre-set controller layouts to make your New World experience even more immersive. As part of optimizing the game to play well with controller, we've introduced the following new features and settings:
- Aim Assist: Helps with aiming ranged attacks. (Controller only, AI only)
- Target Friction: Slower reticle speed on roll over of a valid target (Controller only)
- Enemy Target Lock: Allows you to lock the camera onto an enemy (AI only). Move the right stick to swap between multiple targets. (Works on both controller and mouse & keyboard with middle mouse button and mouse wheel up/down)
- Freeform Movement: Allows running in all directions including towards the camera. Holding block or activating target lock will revert to normal strafe navigation. (Defaults to ON with controller, OFF with mouse & keyboard)
- Use Camera Direction for Melee Attacks: If this is off it allows melee attacks and blocking in the direction of your input/character facing instead of your camera facing. (Defaults to OFF with controller, ON with mouse & keyboard)
- Improved feature accessibility:
- Radial wheel for quick access to features like player emotes, issuing commands and setting up camp.
- Shift modifiers to allow for quick access to all combat abilities.
- Improved UX navigation with gamepad for faster actions.
Original Article
Controller support has been officially confirmed to be coming to New World, and while we're waiting for that to happen, this guide is gonna walk you through a method to play with a controller right now.
If you'd prefer to watch the guide in video format, we've got that covered as well.
Getting Started
If you don't want to start from scratch, you can download my direct setup. Clicking that link will prompt a Config Preview screen on Steam, where you can just hit Apply Configuration to set it all up automatically, then follow the next steps in the guide.
We are going to use Big Picture mode in this guide, but the process is very similar for the regular Steam client UI as well. To enable this mode, click the "Big Picture" button in the top right corner in the Steam client, or press the home button on your controller while Steam is running.
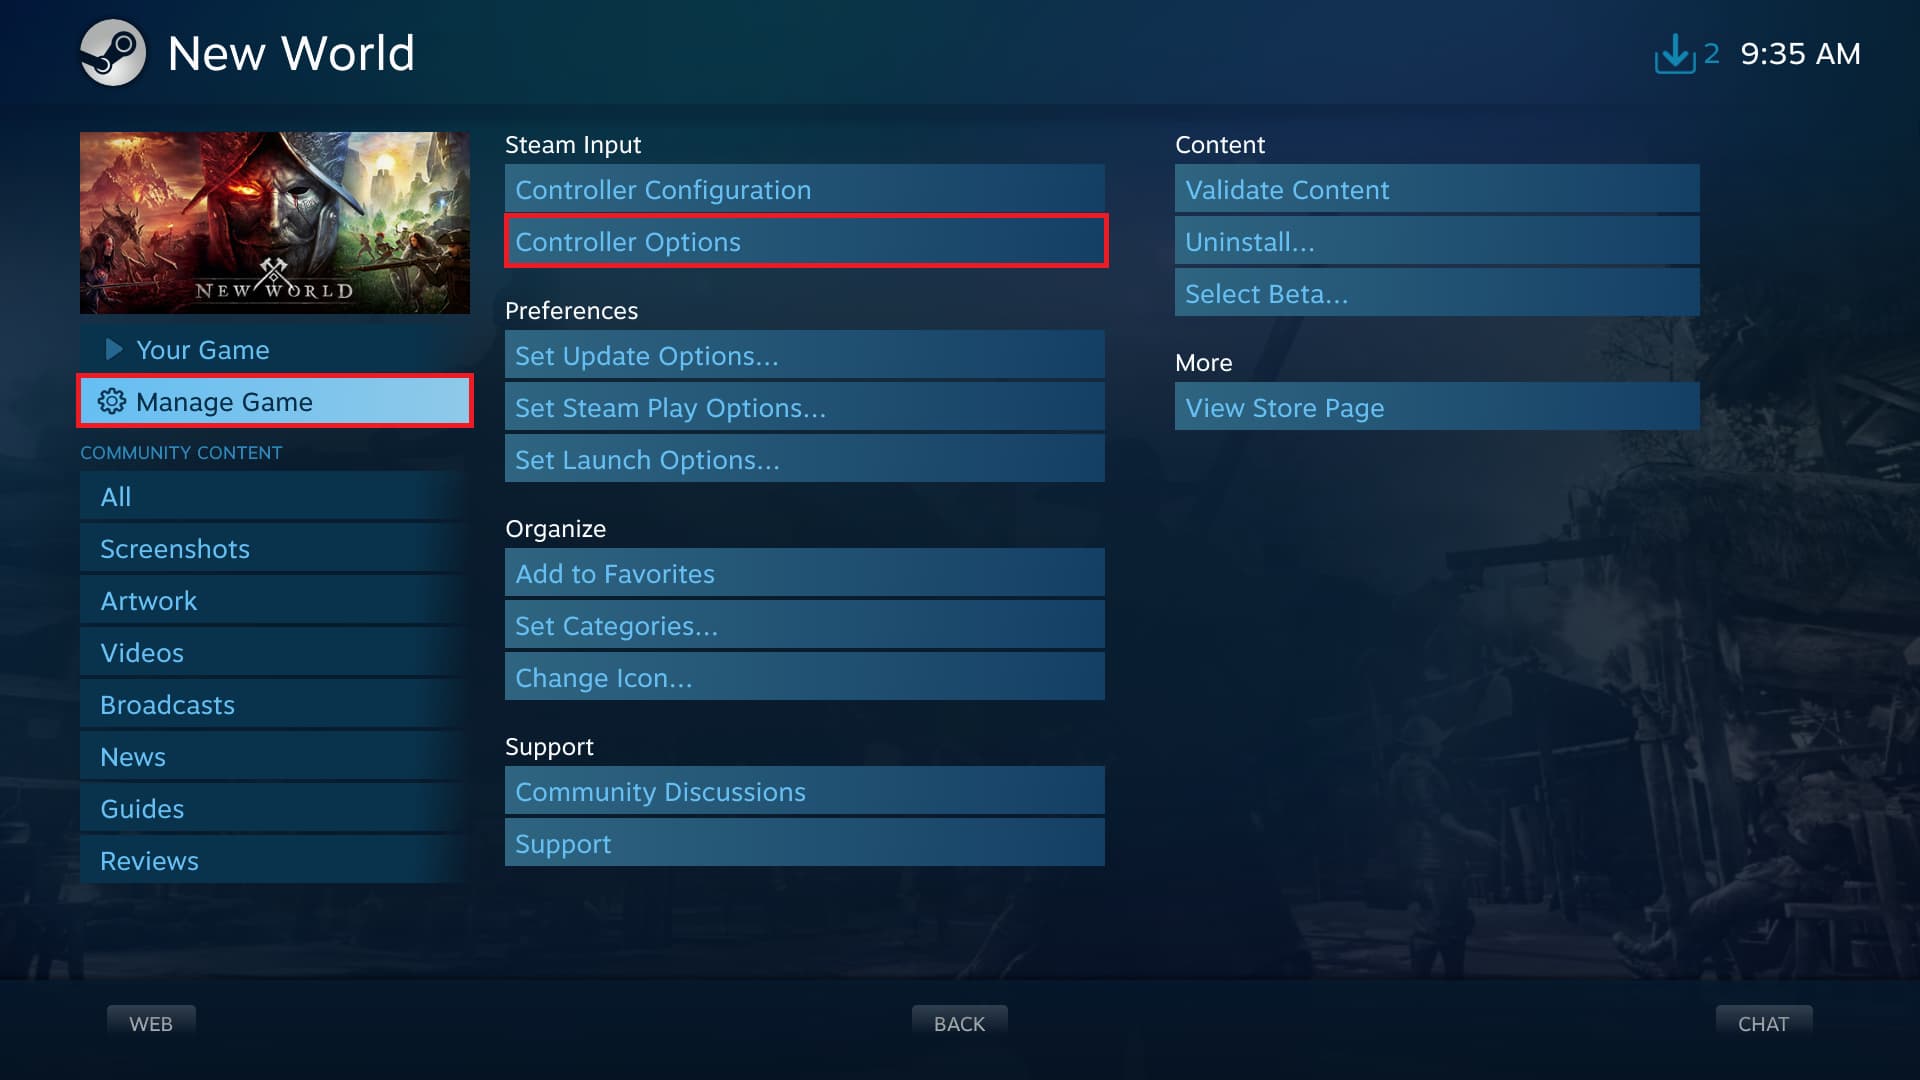
First, open up the game in Steam and go to Manage Game -> Controller Options.
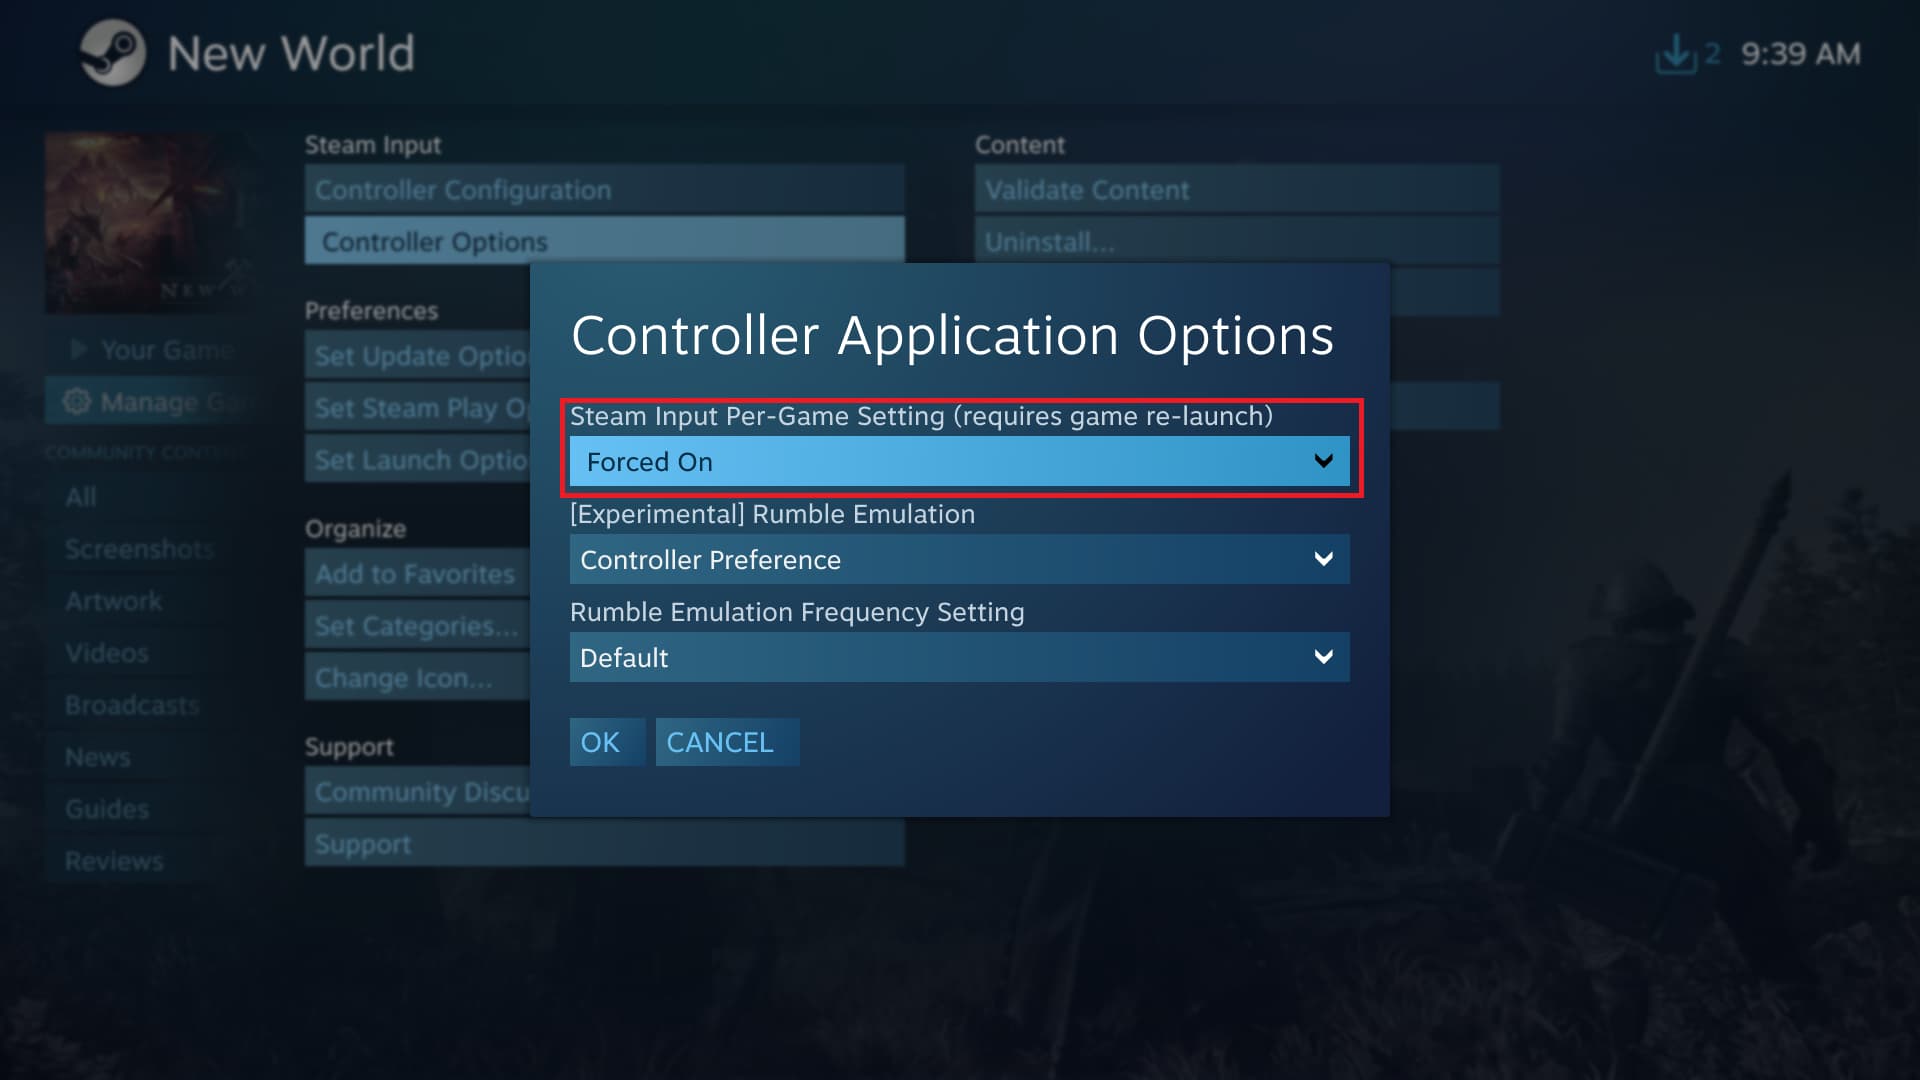
Make sure Steam Input Per-Game Setting is set to Forced On.
Ginger Prime 2023 Setup
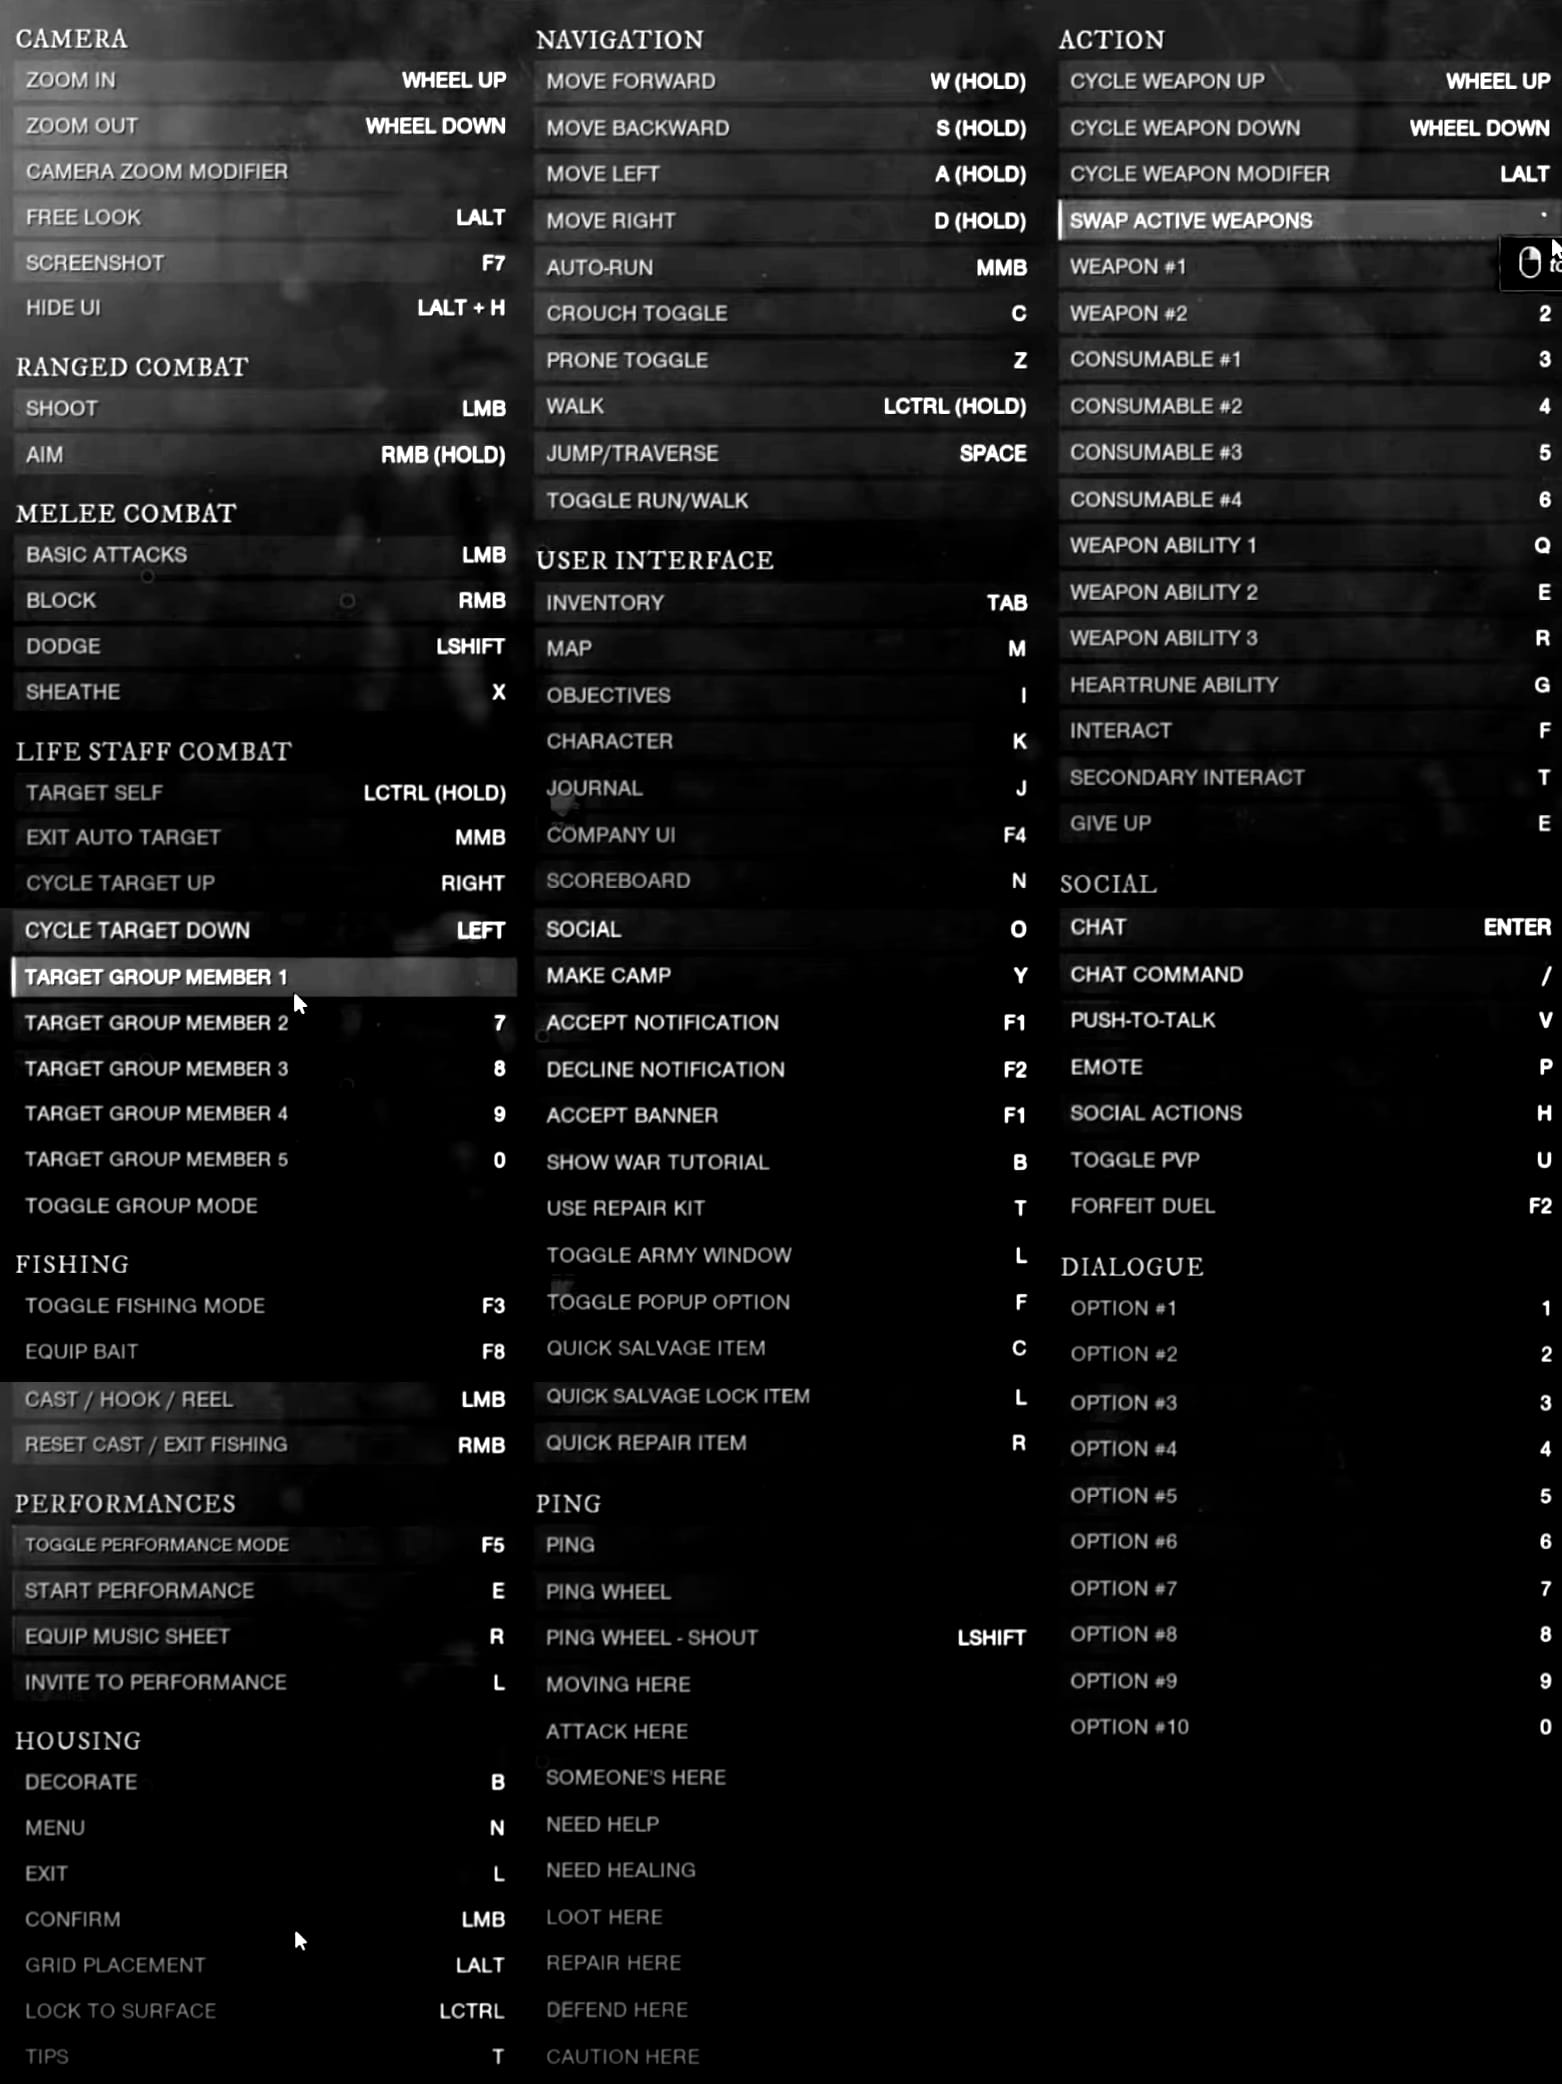
If you've downloaded my controller config, head over to the Manage Game -> Controller Configuration so we can take a look at the inputs.
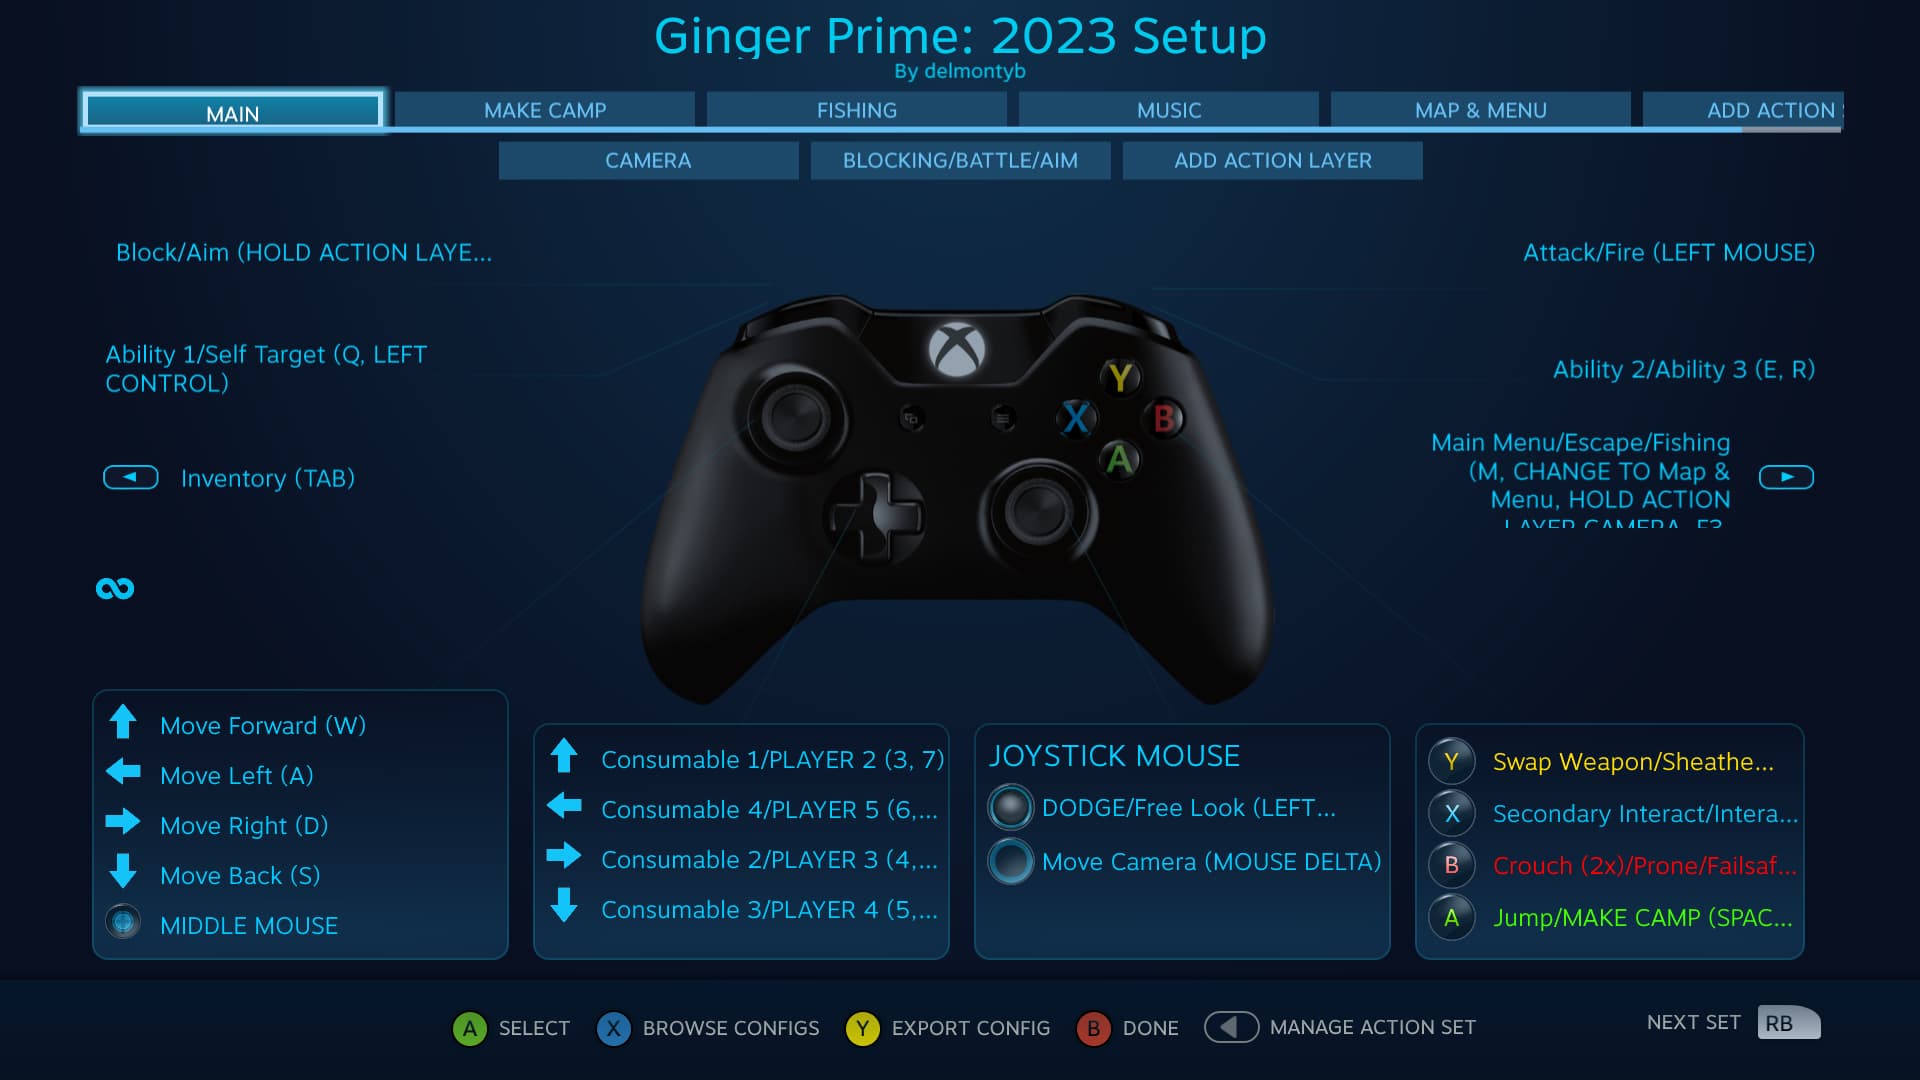
I've simplified this setup to make some functions easier to use, being that on PC and Steam Deck you still have access to a keyboard and mouse, so this setup is focused on player speed and enjoyment rather than having every possible feature mapped into the guide.
Let's break it down what this all does
- Left Stick = Movement
- Left Stick Click = Auto Run
- D-Pad
- Up = Quick Use Slot 1 (3 Key)
- Right = Quick Use Slot 2 (4 Key)
- Down = Quick Use Slot 3 (5 Key)
- Left = Quick Use Slot 4 (6 Key)
- D-Pad Hold
- Up = Target Party Member 2
- Right = Target Party Member 3
- Down = Target Party Member 4
- Left = Target Party Member 5
- Right Stick = Move Camera
- Right Stick Click = Dodge
- YBAX Buttons
- A Button (Tap) = Jump
- A Button (Hold) = Make Camp
- B Button (Double Tap) = Crouch
- B Button (Hold) = Prone
- B Button (Long Hold) = ESC / Return to Main Menu
- X Button (Tap) = Interact
- X Button (Double Tap) = Secondary Interact
- Y Button (Tap) = Swap Weapon
- Y Button (Hold) = Sheath Weapon
- Select Button = Inventory
- Start Button
- Tap = Map / Menu
- Hold = Camera Settings
- Double Tap = Fishing Mode
- Left Bumper = Ability 1
- Right Bumper
- Tap = Ability 2
- Hold = Ability 3
- Left Trigger = Block Aim / Modify
- Y (Tap) = Ability 1
- Y (Double Tap) = Ability 2
- Y (Hold) = Heart Rune Ability
- X (Tap) = Start Music Mode
- Right Trigger
- Tap = Attack
- Hold = Heavy Attack
Key Binding Changes
I make several key binding changes to better suit my playstyle, and you're free to use these or map your own changes into the controller config. Whatever works better for you.
Customizing the Setup
To make your own changes to the layout, press Shift + Tab (or whatever your overlay keybind is) in game to pull up the steam menu and then select Controller Configuration.
At the top of the UI you can see the different action layers (think game scenes).

Within the correct action layer, click the button you want to modify. When you pull up the binding, there are some key features that you'll want to pay attention to:
- Select Binding For - this is the name that you want to display.
- The keyboard and mouse - just click on the button you want to modify.
- If you want the binding to do multiple things, make sure the Toggle Multi-Button option is set to On.
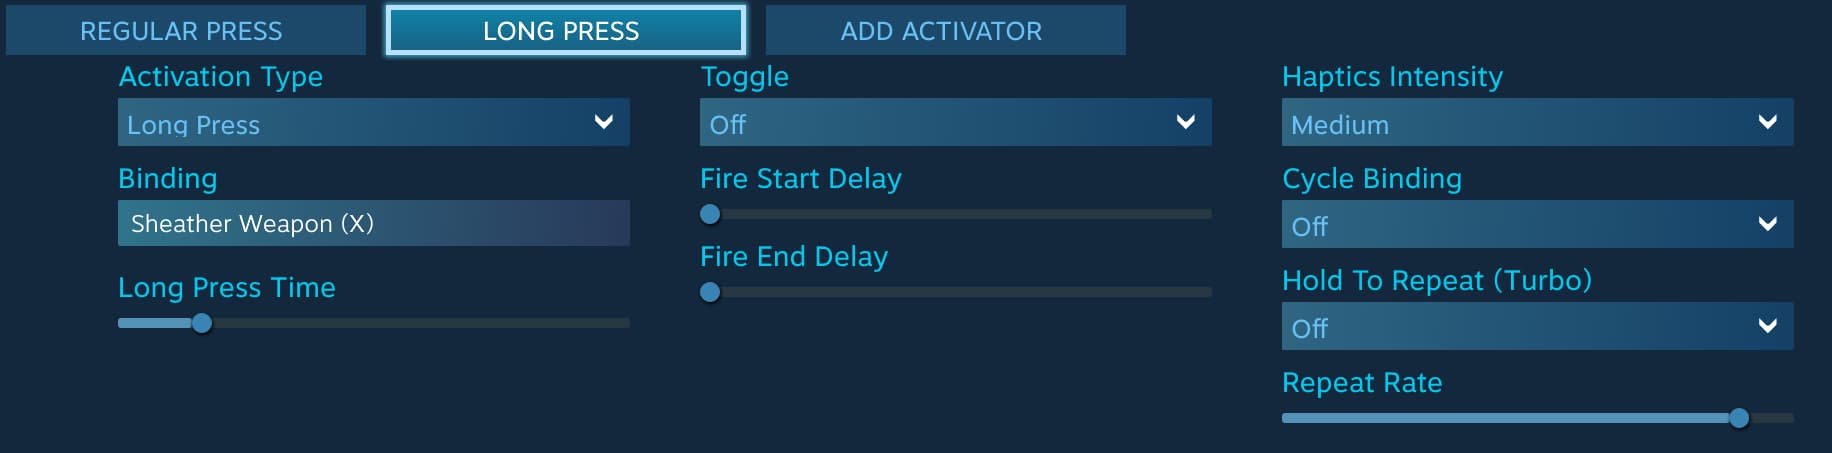
- You can press Show Activators to better help control what type of press we're talking about.
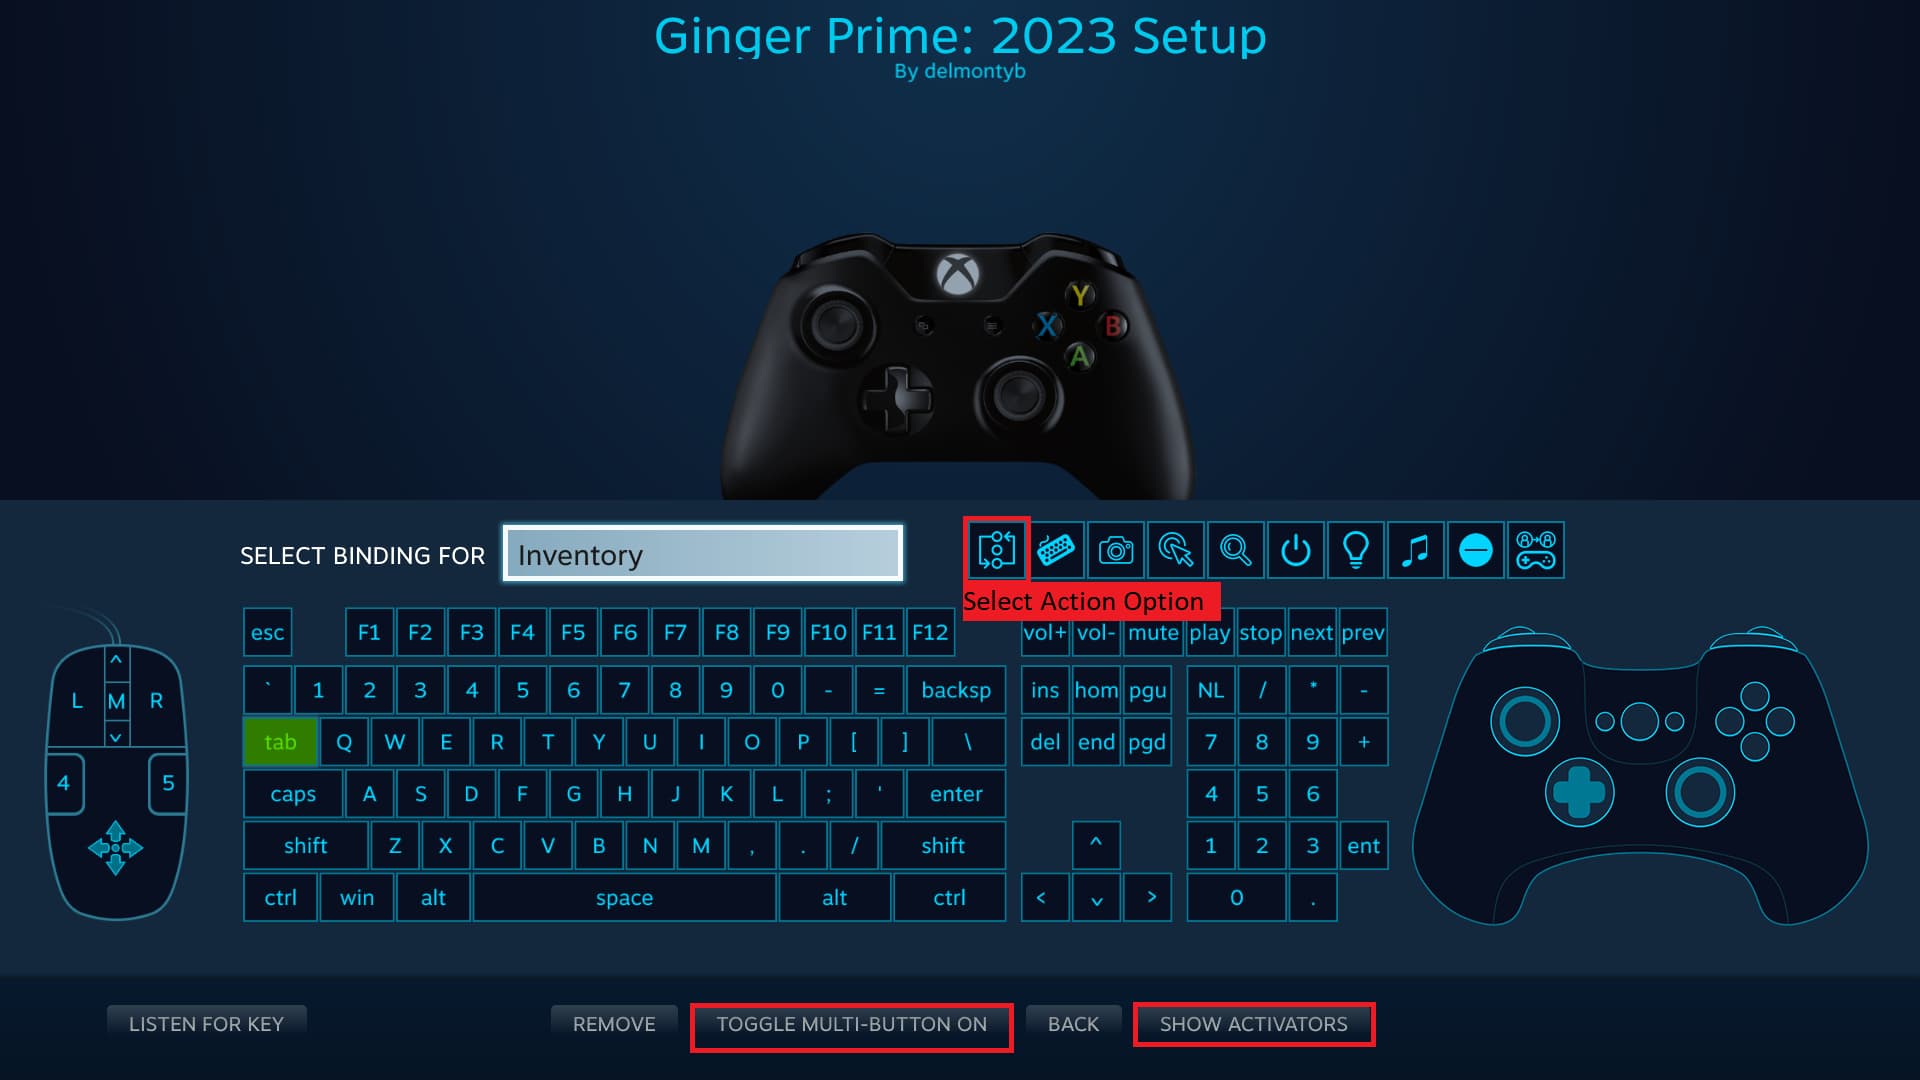
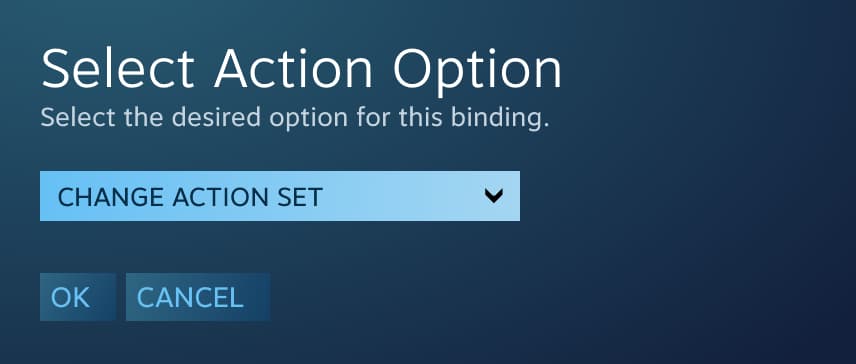
If you want the button to move to a different action layer or set, click the Select Action Option button. From here, you'll have the ability to change, hold, apply, or remove. We'll focus on the Change for this, but I use Hold for holding down the left trigger for example.
After setting the dropdown to Change Action Set, hit OK.
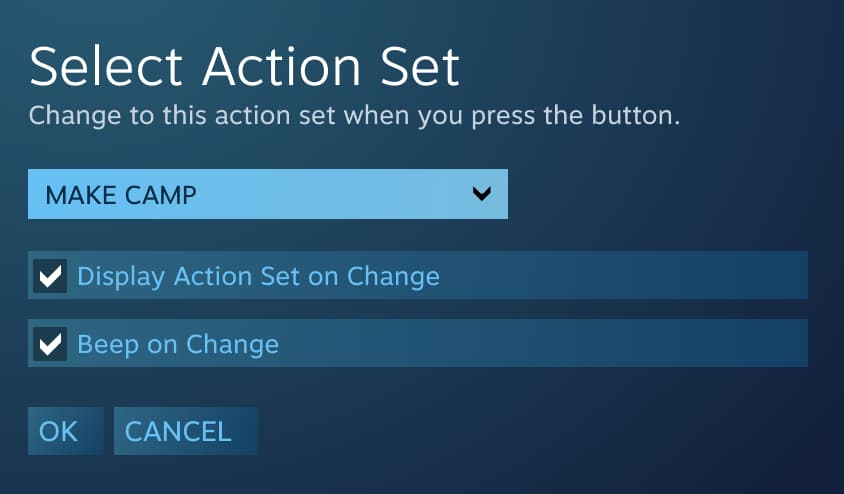
Select your action set, and from here, you can have it choose to display or even beep on change.

If you want to create your own action set, without impacting any changes in this guide, just go click on Add Action Set.

You can choose to copy a previous action set, or start from scratch.

If you want to have a button function differently depending on the type of press, or how long you hold down the button, you want to pull up the Activators. Here you can add as many as you need, and assign them a different function.